![Guide on How to Crop Image & PDF in Preview [Step-by-Step]](https://b.jopdf.com/wp-content/uploads/2026/04/how-to-crop-in-preview.png)
Introduction :
Preview is one of the most underrated tools built into every Mac. Most of us only use Preview as a viewer. Surprisingly, it includes essential editing features like cropping images and PDFs. Whether you want to remove unwanted background areas from a photo or cut down a PDF to just one section, learning how to crop in Preview can save you from buying expensive editing software. In this comprehensive JOPDF article, you can also learn other related content.
As one of the best PDF editors for Mac, Preview provides you with some basic but useful editing features for PDFs and images. You can use Preview to annotate PDFs, highlight text in PDFs, or crop PDFs. Because Preview is pre-installed, it is often the fastest way to perform quick edits without relying on third-party software.
If you need to crop a multi-page PDF and want access to other advanced editing features, you can use Preview alternatives such as JOPDF and Adobe Acrobat. Now, let’s explore how to crop in Preview and find the best alternative way.
How to Crop an Image in Preview
Preview can serve as an image cropper and editor. You can use it to edit and crop images in JPG, PNG, GIF, or HEIC format. How to crop a picture on a Mac using Preview? Follow the steps below.
Step 1. Open Your Image in Preview
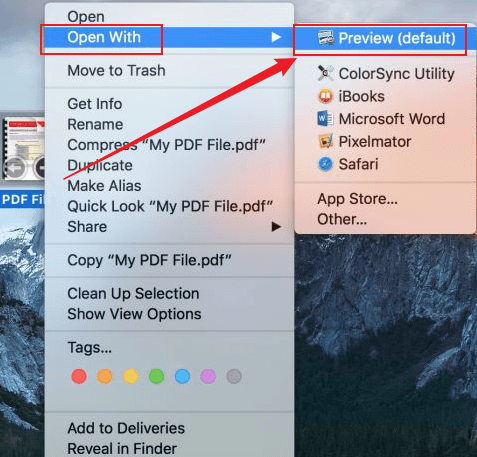
- Locate your image and double-click it to open it in Preview.
- Alternatively, right-click on the image, click Open With, and select Preview.
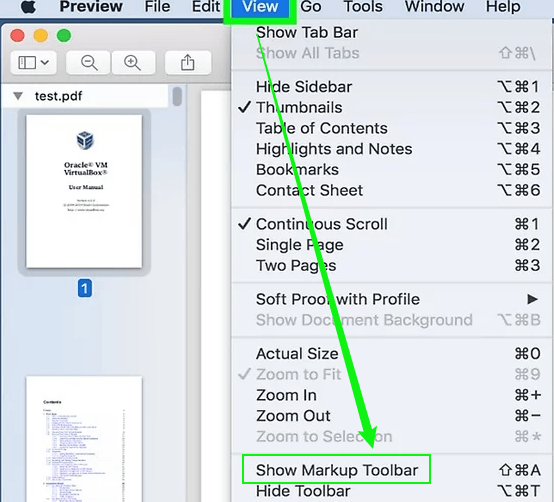
Step 2. Access the Show Markup Toolbar
- Click the Show Markup Toolbar option (a pencil icon) in the top-right corner. Next, you can view selection tools, shapes, text, and a signature button.
- If you can’t find the Show Markup Toolbar option, go to View and click Show Markup Toolbar.
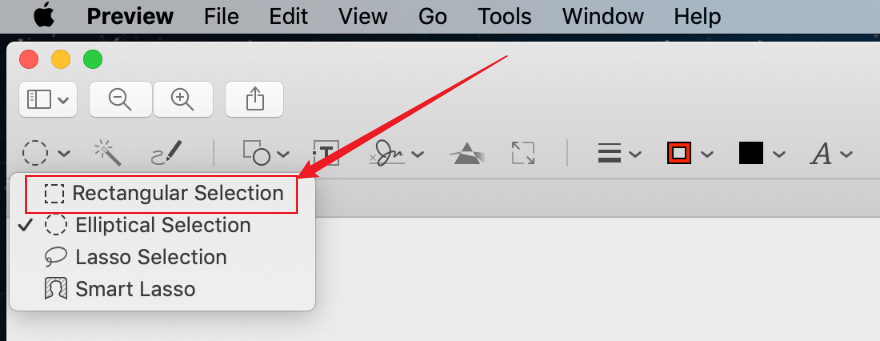
Step 3. Select the Area to Keep
- Click the Rectangular Selection tool.
- Click and drag your mouse over the portion of the image you want to keep.
- Then, you can also adjust the selection box as needed.
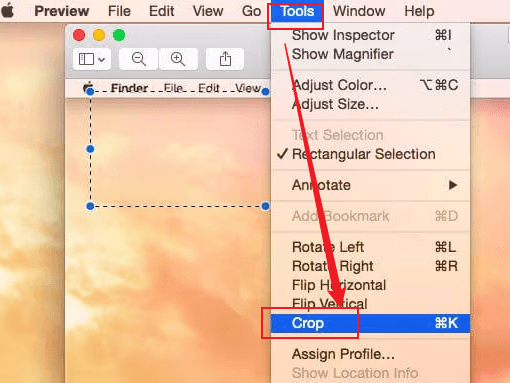
Step 4. Crop the Image
Once your selection is made, go to Tools and click the Crop option. Alternatively, use the keyboard shortcut: Command + K. Then, Preview will remove everything outside the selected area.
Step 5. Save Your Cropped Image
Finally, click File and Save to save the cropped image. Or, you can click File and Export to save a new copy without changing the original image.
How to Crop a PDF in Preview on Mac
Preview enables you to edit a PDF on Mac for free. You can use the cropping feature in Preview to remove margins or hide private information. Unlike cropping images in Preview, PDF cropping is non-destructive. In other words, you can reserve the cropped PDF later. How to crop a PDF on Mac using Preview? Here are the step-by-step instructions for your reference.
Step 1. Open your PDF document in Preview.
Step 2. Click Show Markup Toolbar and select the Rectangular Selection tool.
Step 3. Click and drag the mouse cursor to choose the area you want to remain.
Step 4. Go to Tools > Crop. Or press Command + K.
Step 5. At last, press Command + S to save the cropped PDF. If you need to permanently remove cropped content, go to File > Export and set the Format to PDF. Meanwhile, uncheck the “Allow cropping to hide content but not remove it” option.
How to Crop Multiple PDF Pages at Once in Preview
Can you crop multiple individual images in Preview? No, you can’t. Fortunately, you can crop all PDF pages at once if the crop area is the same on every page. How to crop a multi-page PDF in Preview? Follow the guidance below:
Step 1. Open the multi-page PDF in Preview.
Step 2. Click View and select the Thumbnails option to show the sidebar.
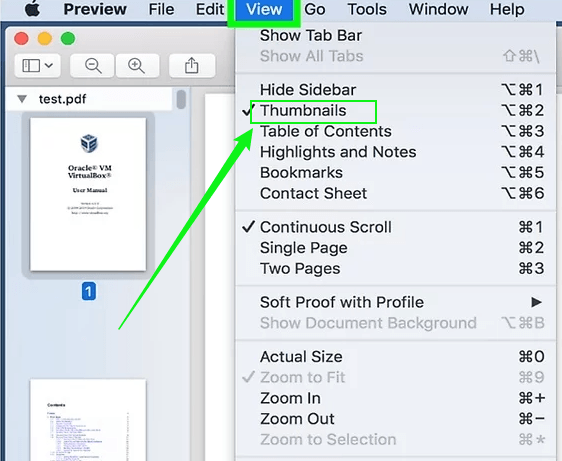
Step 3. Click one thumbnail and then press Command + A to select all PDF pages.
Step 4. Go to Show Markup Toolbar > Rectangular Selection to choose the area you want to keep.
Step 5. Click Tools and Crop to remove the unwanted section. Finally, save the cropped PDF file.
Why Can’t I Crop in Preview
Nothing is more frustrating than a greyed‑out crop tool. Here’s how to fix the most common problems when the Preview crop tool not working. Here, let’s have a look.
#The Selection Tool is Not Enabled
If you haven’t made a selection, the Crop option can be greyed out or disabled. Make sure you have selected the Rectangular Selection tool and dragged the cursor to select an area. Then, the crop option can become active immediately.
#The PDF File is Locked
If the PDF file is locked or read-only, you can’t crop in Preview. In that case, you can right-click the file, click Get Info, and uncheck the Locked option.
#PDF Permissions Are Restricted
You can’t crop a PDF in Preview if the PDF is protected from editing. In this case, you need to remove the restricted permissions. JOPDF is a reliable tool that can help you remove a password from a PDF.
#The Show Markup Toolbar is Not Visible
When the Show Markup Toolbar is hidden or not visible, click View and Show Markup Toolbar to make it visible.
Best Alternative to Preview for Cropping PDFs
While Preview is excellent for basic tasks, it has limitations with PDFs. When you need permanent PDF cropping or require advanced editing tools, try other good alternatives. Here are some reliable Preview alternatives you can try:
- JOPDF
- Adobe Acrobat Pro
- SwifDoo PDF
- UPDF
JOPDF is a reliable, free PDF editor for Windows, Mac, and Linux. It enables you to crop PDF pages permanently. Additionally, you can use it to resize PDFs, add or remove PDF pages, extract PDF images, split PDFs, and more. Here, let’s learn how to crop a PDF on Mac for free with JOPDF.
Step 1. Download and install this free PDF cropper on your Mac. Then, launch it.
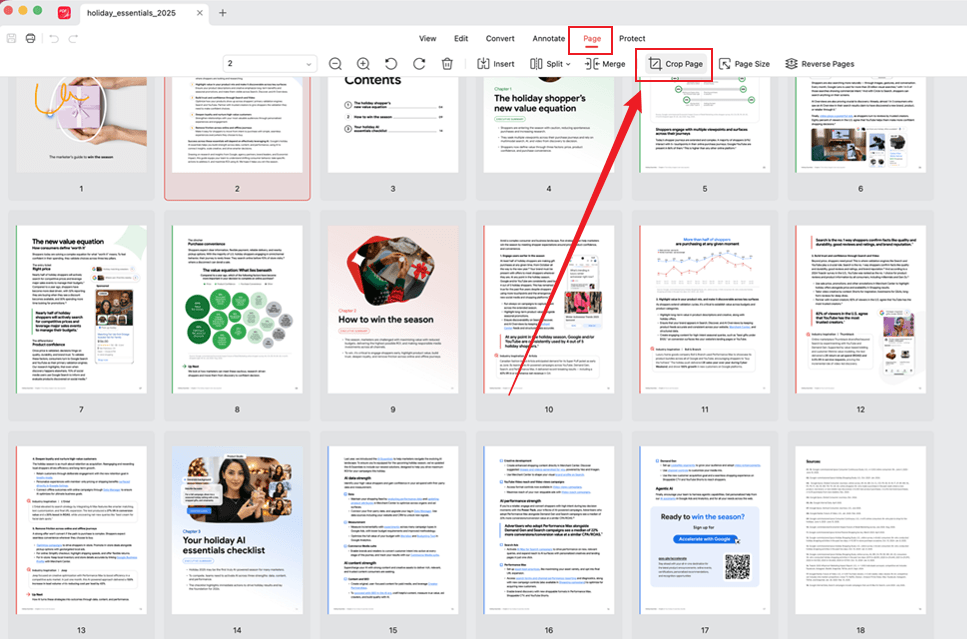
Step 2. Click Open PDF or Organize PDF to import the target PDF file.
Step 3. Select the PDF page you need to crop and click the Crop Page option under the Page tab.
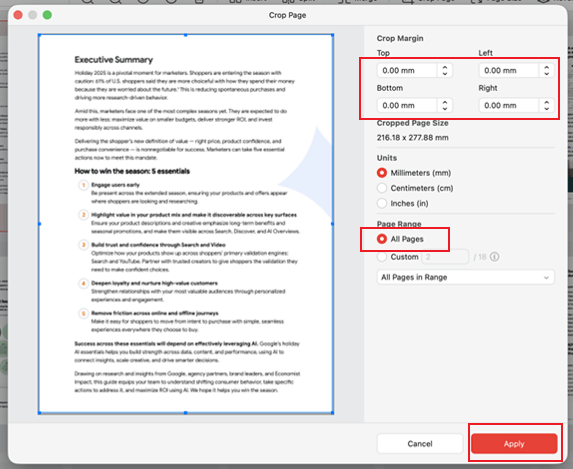
Step 4. In the left Preview window, drag the edge of the page to crop the PDF page. Or, enter the needed values under the Crop Margins option to crop the PDF in JOPDF. Meanwhile, you can select the All Pages option to crop multiple pages at once. Next, click Apply.
Step 5. At last, click the Save icon to export the cropped PDF file.
Conclusion
Learning how to crop in Preview on Mac is one of the easiest ways to handle quick edits without installing additional software. You can use Preview to crop images and PDFs on Mac with ease. In this JOPDF article, I show you the exact steps to crop in Preview. If you need to crop PDFs permanently or require advanced editing features, use JOPDF or other Preview alternatives. By following the steps and tips in this guide, you’ll be able to crop efficiently and get the most out of this underrated macOS app.
FAQs
Table of Contents
Your Best Free PDF Expert in PDF editing, compressing, converting, annotating, protect, organizing, and more.
Free DownloadWindows · macOS · Linux
Olivia
“Olivia is an editor at JOPDF, where she writes practical guides and insightful articles on managing PDFs—covering topics like editing, annotating, converting, and organizing files efficiently. Passionate about clear communication and digital productivity, Olivia enjoys spending her free time cooking, watching movies, and hiking to unwind and find inspiration for her writing.”