![How to Combine Screenshots into One PDF [Windows, Mac, and Mobile]](https://b.jopdf.com/wp-content/uploads/2026/03/how-to-combine-screenshots-into-one-pdf.png)
Introduction :
As digital tasks increase, knowing how to combine screenshots into one PDF helps users manage and share several images at once. By converting screenshots to PDF, you can manage, share, print, and store your files more efficiently. Whether for work reports, study notes, or documentation, this method is highly useful. In this JOPDF article, we’ll show practical ways to turn multiple screenshots into a single PDF on Windows, Mac, iPhone, and Android.
Combining multiple screenshots into one PDF keeps your files organized, professional, and simple to handle. By merging multiple images into a single document, you make it easier to share via email or cloud platforms, rather than managing separate files. This method minimizes clutter, preserves the proper sequence of content, improves clarity, and works well on all devices. In the end, merging multiple screenshots into one PDF helps save time, reduce storage use, and minimize effort.
How to Combine Screenshots into One PDF on Windows
Windows users have multiple built-in and third-party options for easily merging images. You can easily convert screenshots to PDF without installing anything, using the simple tools your system provides. Using either Windows’ default features or online converters, combining screenshots is simple and quick.
This section explains two simple techniques for turning your screenshots into one PDF.
Method 1. Combine Screenshots into One PDF for Free with JOPDF
As a free PDF converter and editor, JOPDF provides an easy way to organize and handle your files. With this tool, you can quickly combine images into one PDF without hassle or advanced skills. You can quickly add images into a PDF, arrange pages as needed, and save a clean, professional file thanks to its intuitive design. Overall, JOPDF serves as a reliable tool for anyone— students or professionals— who wants to manage screenshots efficiently.
Let us check out how to combine screenshots into one PDF for free on Windows with JOPDF in just a few clicks.
Step 1. First, download JOPDF for Windows and open it once the installation is complete.
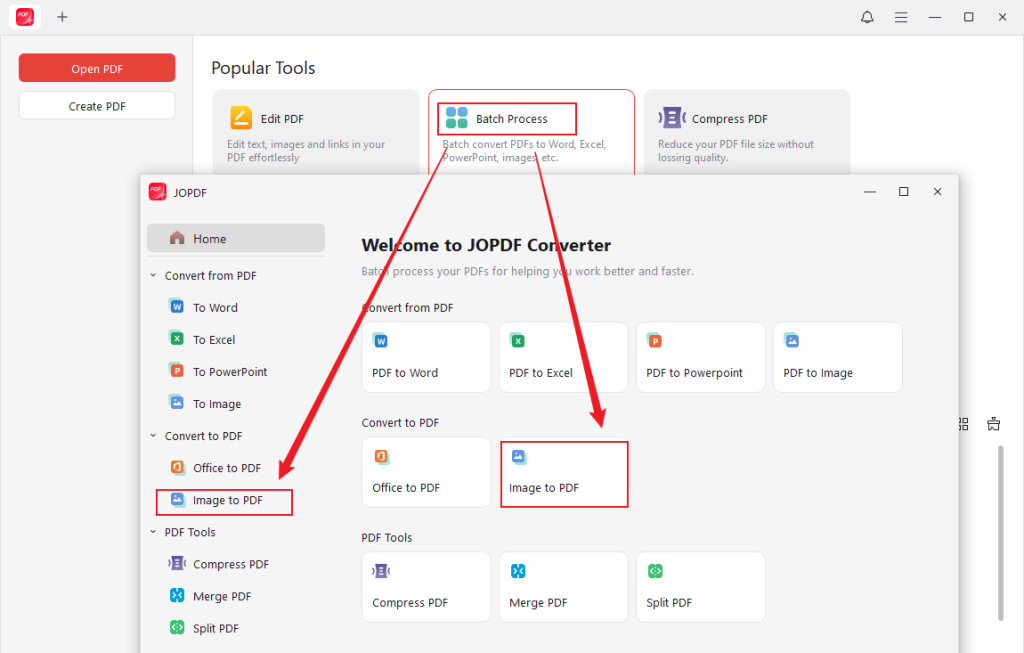
Step 2. On the main interface, click Batch Process under Popular Tools.And choose Image to PDF under the Convert to PDF category in the left pane.
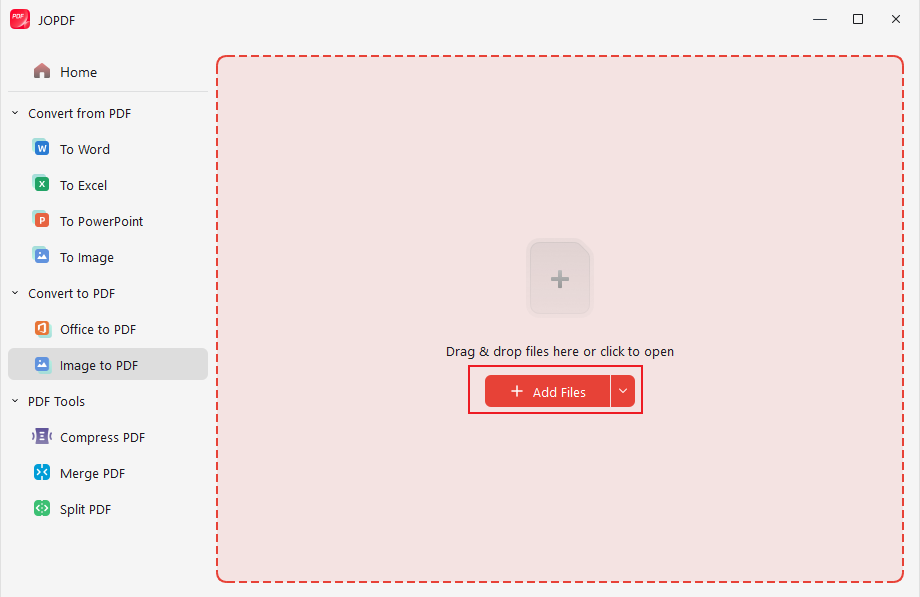
Step 3. Tap +Add Files to add the screenshots you wish to combine to one PDF.
Note. You can also drag and drop them directly into the interface.
Step 4. Select All Images as One PDF in the Method drop-down at the bottom. Also, specify the Page Size.
Then enter a file name and select Output to choose a save location.
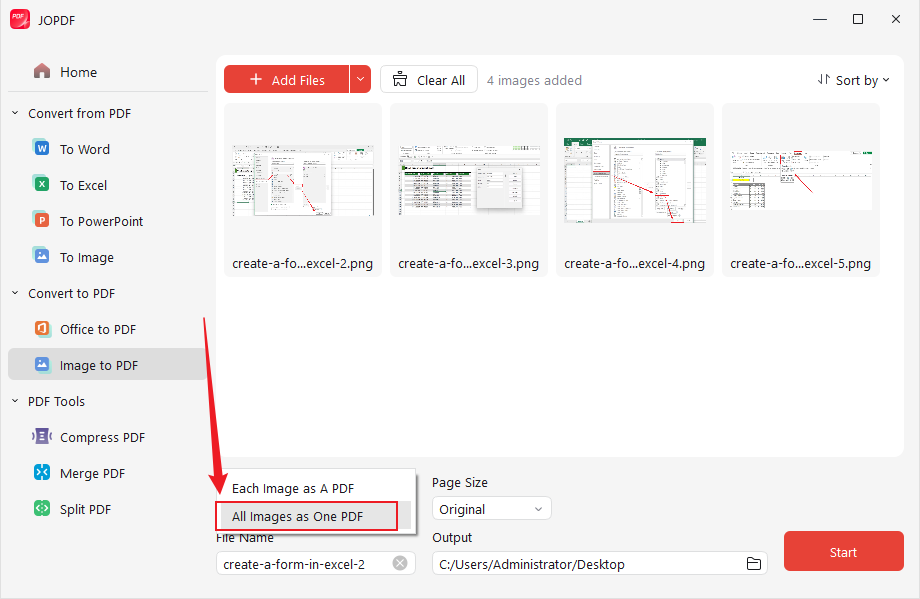
Step 5. Arrange the screenshots in order, then click the Start button to merge them into a single PDF for free.
🌟Why is JOPDF recommended?
From my experience, JOPDF is a reliable choice for anyone looking to merge multiple screenshots into a single PDF efficiently. When I needed to organize project images quickly, it helped me combine and arrange them in just a few clicks without losing quality. In my experience, its intuitive interface and dependable performance make it a tool worth using.
Method 2. Combine Screenshots into a PDF Using Microsoft Print to PDF
Using the built-in Microsoft Print to PDF feature on Windows is another simple way to combine screenshots. This tool lets you easily convert documents or images to PDF without needing to install extra software. This method works through the Print menu, making it simple and efficient to turn multiple screenshots into one PDF.
Let us see how to merge multiple screenshots into one PDF on Windows 10/11using the Microsoft Print to PDF feature.
Step 1. Locate your screenshots in File Explorer.To select all screenshots, hold down the Ctrl key and click each image individually.
Step 2. With all the screenshots selected, right-click on one of them and choose “Print” from the context menu.
In the Print Pictures window, open the Printer dropdown and choose Microsoft Print to PDF.
Under “Layout,” choose your desired layout for the PDF. The available sizes are Full Page, Wallet Size, 3.5 × 5 in, 4 × 6 in, 5 × 7 in, 8 × 10 in, and Contact Sheet. Depending on how you want the layout, you can set the number of images per page.

Step 3. Then, tweak additional options, including paper size, image quality, and the number of copies per image.
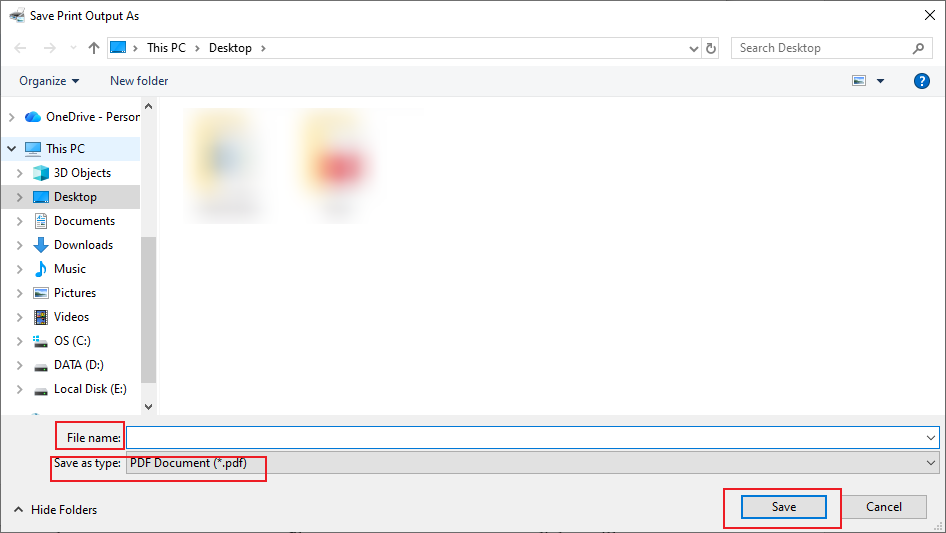
Step 4. Next, select Print to create your PDF file.A “Save Print Output As” dialog will appear.
Then choose a destination folder, enter a name for your PDF, and hit the Save button. Your screenshots will now be combined into a single PDF file.
How to Combine Screenshots into One PDF on Mac
Like on Windows, Mac provides multiple built-in tools for easily combining images. You can easily convert screenshots to PDF on Macwithout installing additional software, thanks to the built-in tools. Whether using Preview or the Print feature, the process is simple, fast, and efficient. Let us learn both methods.
Method 1. Use Quick Actions to Merge Screenshots into One PDF
With Finder’s Quick Actions, you can take the quickest way to combine multiple screenshots into a single PDF on Mac. This integrated option makes it easy to pick several images and merge them immediately with a right-click. It allows you to convert JPG or PNG to PDF efficiently, providing a convenient method without installing any apps.
Let us check out how to combine screenshots into one PDF using Quick Actions on Mac in a few clicks.
Step 1. Click the Finder icon in the Dock to launch a Finder window on your Mac.
Step 2. Now, choose the screenshots you wish to merge.
Remember. These files will appear in the PDF in the same order that you select them.
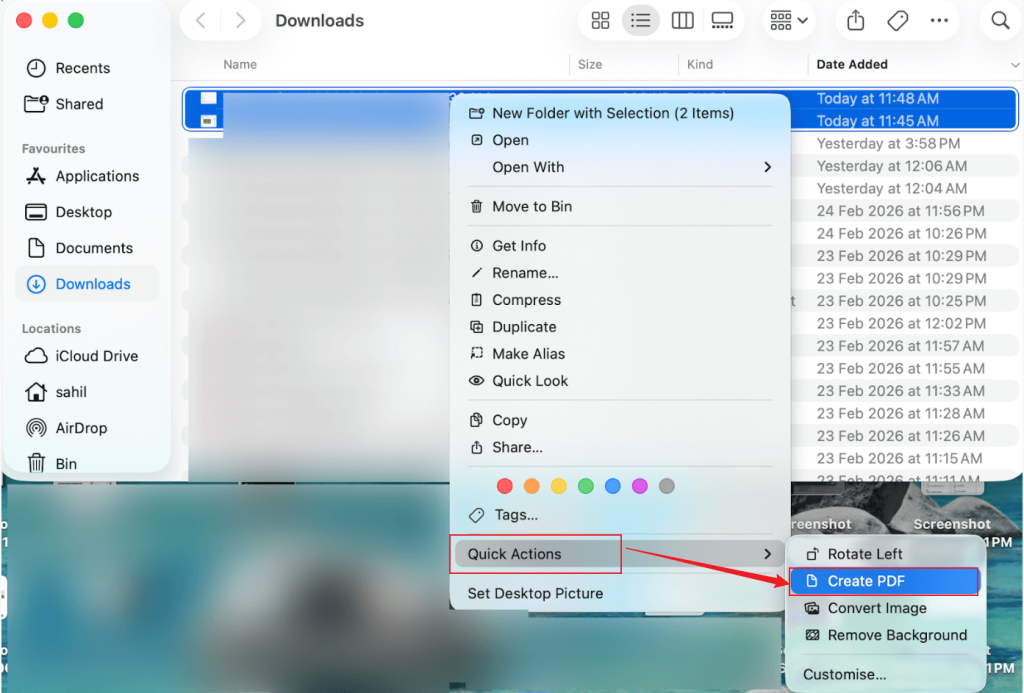
Step 3. After selecting the files, control-click them and navigate to Quick Actions > Create PDF.
Wait for a few seconds. On your Mac, the PDF will be generated using the first selected file’s name.
Method 2. Use Preview to Combine Screenshots into One PDF
Using Preview, you can efficiently combine PNG to PDF and other images into one document on a Mac. The native tool lets you rearrange PDF pages before saving, ensuring your screenshots appear in the correct order. This method gives you more control over the final PDF while using only built-in Mac features.
Let us see how to combine screenshots into one PDF using Preview.
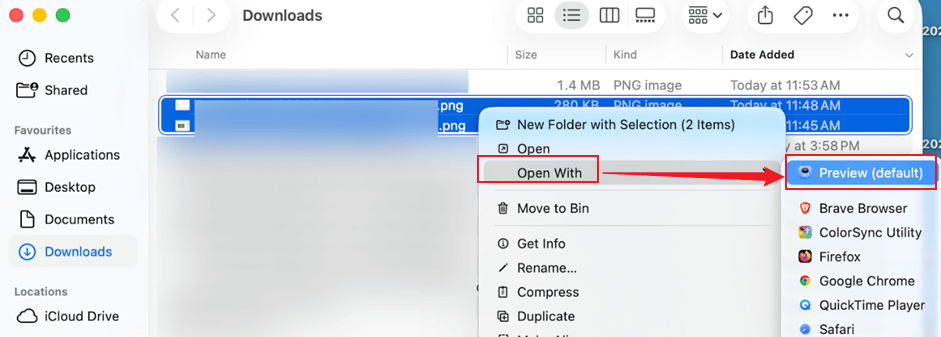
Step 1. Open Finder and select all the desired screenshots you wish to combine. Then, right-click on the screenshots, tap Open With,and choose Preview.
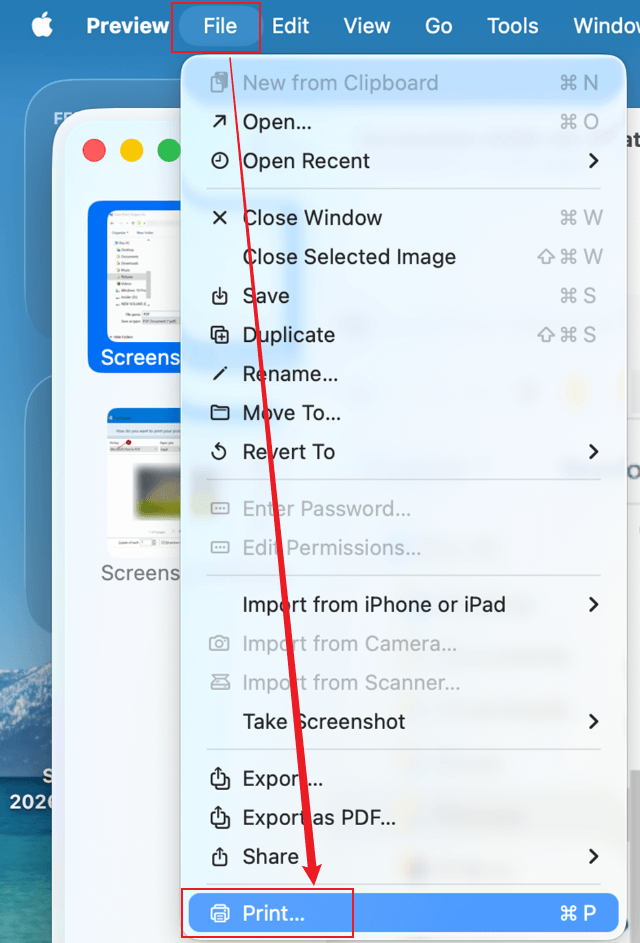
Step 2. As soon as your screenshots open with Preview, go to File in the toolbar and choose Print… from the dropdown menu.
Step 3. Adjust the Paper Size, Orientation, Layout, and other necessary options for the conversion.
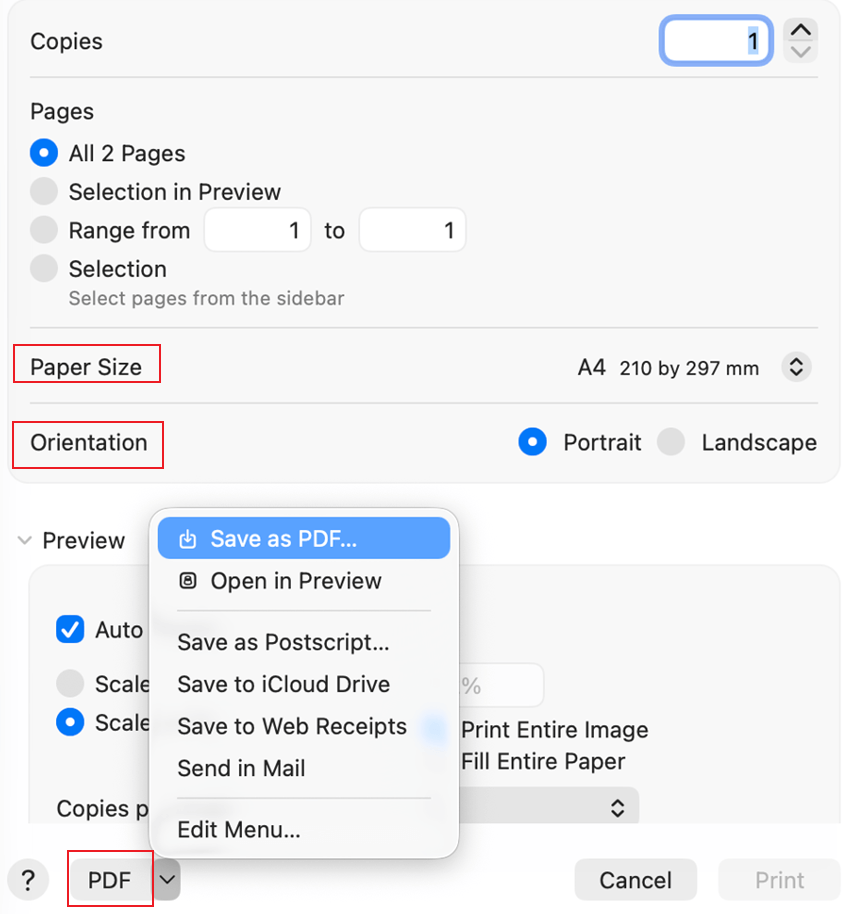
Step 4. Once adjusted, click the PDF button at the lower-left corner. Select where to save the file and the file name. Then click Save to merge the screenshots into a single PDF.
How to Combine Screenshots into One PDF on Mobile Devices
Mobile users can also quickly merge screenshots on iPhone or Android, without a computer. Both built-in options and free applications allow you to organize images and merge them into a PDF. This makes it ideal for sharing notes, receipts, or documents straight from your phone. This section shows how to combine screenshots into a PDF on iPhone and Android using built-in features.
Method 1. Combine Screenshots into One PDF on iPhone via the Photos App
The iPhone’s Photos app lets you easily merge screenshots on iPhone without needing any additional apps. Using Share or Print on selected images lets you swiftly create a single PDF for convenient organization and sharing.
Here’s a simple way to merge screenshots on iPhone with the Photos app.
Step 1. Start the Photos app on your iPhone.
Step 2. Tap Select at the top right corner. And pick the screenshots you want to combine, then save them as a PDF.
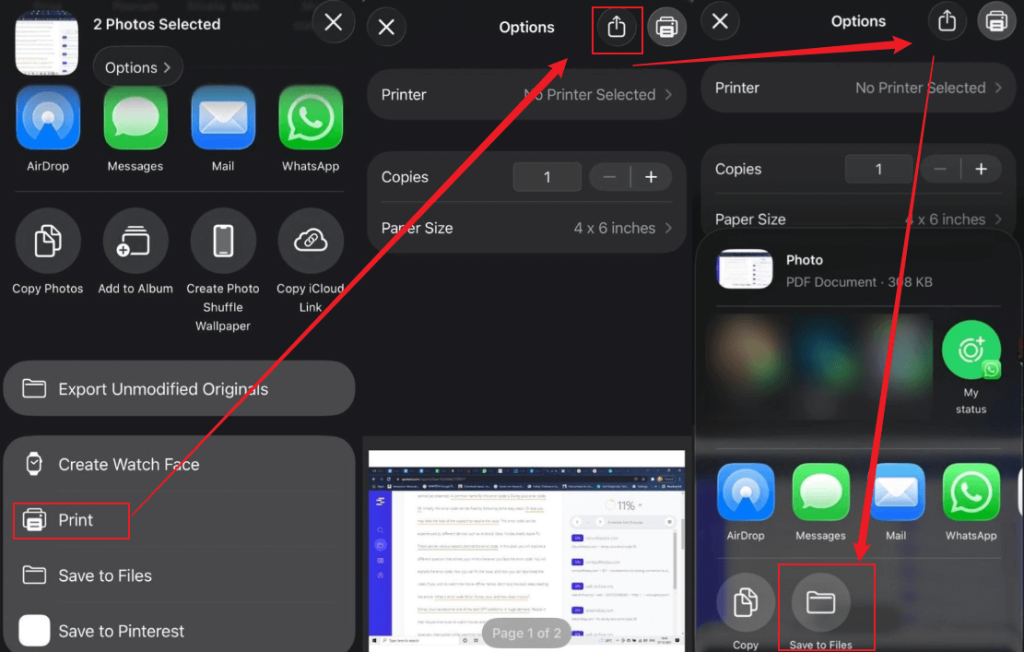
Step 3. Click the Share button (square with pop-up arrow) located in the bottom left. After that, scroll to the bottom and select Print.
Step 4. On the Print Preview screen, use a pinch-out gesture (zoom in) on the image preview. Or tap the Share icon at the top right again to turn it into a PDF.
Step 5. To finish, tap Share, select Save to Files, and choose your preferred location (e.g., On My iPhone or iCloud Drive).
Method 2. Combine Screenshots into One PDF on Android via Google Photos
Android users can easily combine screenshots using Google Photos. By choosing several images and tapping Print or Save as PDF, you can easily merge them into a single PDF. This allows you to organize and share your screenshots quickly, even on the go.
Learn how to combine multiple screenshots into a PDF on Android with Google Photos.
Step 1. Open Google Photos on your Android. Select all the screenshots you wish to combine and save as a PDF.
Step 2. Tap the Share icon in the top right corner.
Step 3. Choose Print from the menu options.
Step 4. At the top, tap the printer dropdown and select Save as PDF.
Step 5. Tap the PDF download button (usually a circular arrow icon) to save the file to your device.
Best Practices When Combining Screenshots into a PDF
Merging multiple screenshots into a tidy PDF makes it quicker to share and easier to manage. By following a few simple tips when merging screenshots, you can create a PDF that is clear, professional, and easy to navigate.
Here are the best tips.
- Organize images beforehand. Organize your screenshots in the proper sequence before merging them.
- Choose consistent file formats. Select JPG or PNG to achieve better image clarity and broader compatibility.
- Compress your images. Shrink large images to prevent the PDF from becoming too heavy.
- Check orientation. Confirm all screenshots are positioned correctly before creating the PDF.
- Add page numbering if required. Allows smoother navigation through longer PDFs.
- Use reliable tools. Choose trusted apps or built-in features to avoid errors or loss of quality.
- Preview before saving. Always examine the finished PDF to verify that all elements appear correctly.
Conclusion
Knowing how to combine screenshots into one PDF can make organizing, sharing, and storing your images much easier and more professional. No matter if you’re on Windows, Mac, iPhone, or Android, built-in tools and free apps make merging screenshots easy. Adhering to best practices helps make your final PDF clear and well-organized. With these techniques, handling multiple screenshots is now simple and convenient.
FAQs
1. On Windows. Use the built-in Microsoft Print to PDF feature or a free tool like JOPDF to merge your screenshots into a single PDF.
2. On Mac. Use Quick Actions in Finder or the Preview app to select multiple screenshots and save them as a PDF.
3. On iPhone. Choose your screenshots in the Photos app, then tap Share or Print to PDF to merge them into one PDF.
4. On Android. In Google Photos, select your screenshots and choose Print > Save as PDF to merge them.
All these methods enable you to combine screenshots into a single PDF without spending money.
Choosing these formats keeps your screenshots clear and professional in the PDF while keeping the file size manageable.
Table of Contents
Your Best Free PDF Expert in PDF editing, compressing, converting, annotating, protect, organizing, and more.
Free DownloadWindows · macOS · Linux
Olivia
“Olivia is an editor at JOPDF, where she writes practical guides and insightful articles on managing PDFs—covering topics like editing, annotating, converting, and organizing files efficiently. Passionate about clear communication and digital productivity, Olivia enjoys spending her free time cooking, watching movies, and hiking to unwind and find inspiration for her writing.”
![Batch Convert Word to PDF on Windows/Mac [Free & Paid]](https://b.jopdf.com/wp-content/uploads/2026/03/batch-convert-word-to-pdf.png)
![5 Best Ways to Combine HEIC to PDF [Windows/Mac/iOS/Online]](https://b.jopdf.com/wp-content/uploads/2026/03/combine-heic-to-pdf.png)