![How to Print Selected Area in PDF in 2026 [4 Best Ways]](https://b.jopdf.com/wp-content/uploads/2026/03/how-to-print-selected-area-in-pdf.png)
Introduction :
Printing only a particular section of a PDF can help save paper, ink, and time—especially when you just need a chart, paragraph, or a small area instead of the full document. Such a need typically appears when examining reports, studying content, or passing along only the relevant parts of a document. This article from JOPDF covers how to print the selected area in PDF with four simple techniques on both Windows and Mac, using free desktop software and native options.
Why Only Print a Selected Area in PDF?
Printing a full document isn’t always required, particularly when you only need a certain section. Opting to print only part of a PDF document makes managing and sharing information faster and more practical.
Here’s a list of a few reasons.
- Reduce paper waste. Printing just the needed section prevents extra pages, conserving paper and promoting eco-friendly printing habits.
- Save printer ink or toner. Printing only the selected area helps reduce ink or toner consumption, lowering printing expenses over time.
- Focus on relevant information. Sometimes you only need a chart, paragraph, or table from a PDF. Printing a selected area helps you keep the information concise and easier to review.
- Create cleaner handouts or references. When sharing materials with colleagues or students, printing only the key sections makes the document clearer and better organized.
How to Print the Selected Area in PDF with JOPDF
Supported OS: Windows, Mac, and Linux.
JOPDF is a practical, lightweight PDF tool built to handle everyday PDF tasks quickly and efficiently. Users can print PDFs on Mac, Windows, and Linux without needing complicated installation or advanced knowledge. With versatile printing options, you can quickly select and print just the specific part of a document you need. The tool provides options to resize a PDF for printing, so your selected content aligns properly on the page.
Find out how to print the selected area in PDF with JOPDF in just a handful of clicks.
Step 1. Download and install JOPDF on your computer. Once launched, tap the Open PDF button to import the desired PDF into the program.
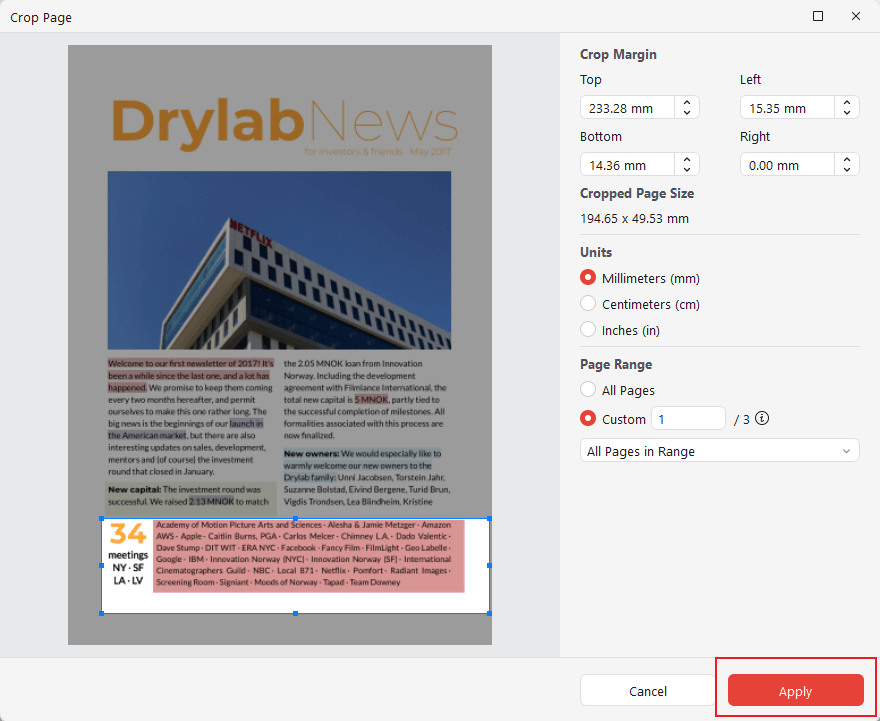
Step 2. Now, go to the Page menu in the top toolbar. And select Crop Page in the secondary menu.

Step 3. In the Crop Page window, set the Crop Margin, Units,and Page Range.After that, click Apply.
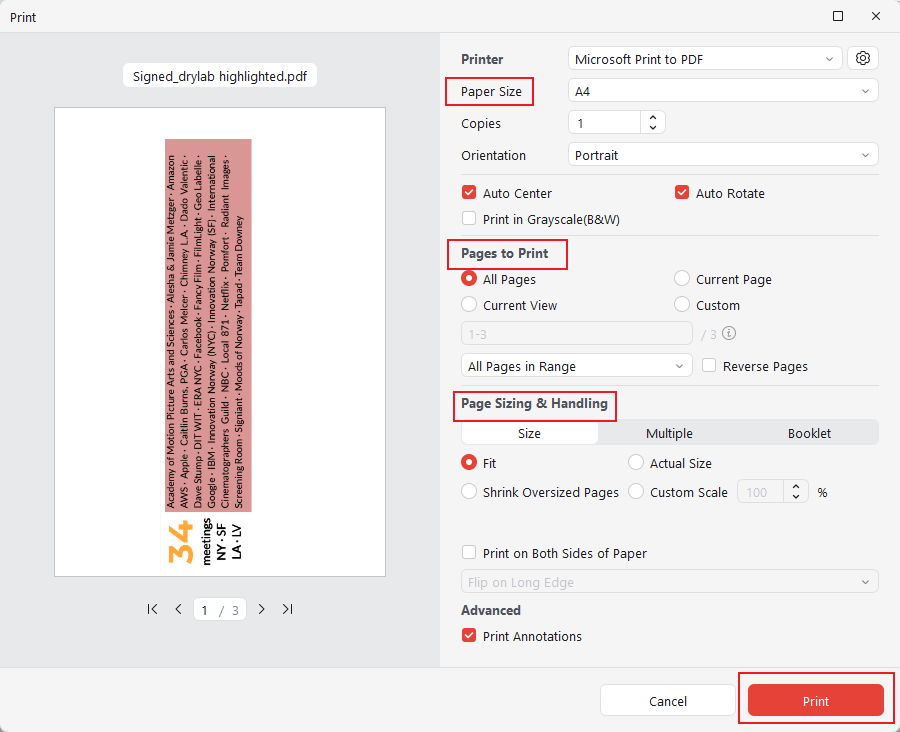
Step 4. Next, move to the Print menu. In the Print window, select the Paper Size, Pages to Print,and Page Sizing & Handling sections. Then, click Print.
Bonus Tip. When selection tools don’t work, simply capture a screenshot of the desired section and print it via JOPDF for an easy solution.
This is how you can take a screenshot of the area you need in a PDF and print it with JOPDF in just a handful of clicks.
Step 1. Download and launch JOPDF on your Windows or Mac computer.
Step 2. Once the software is launched, press Open PDF to import the PDF you want to work with.
Step 3. Choose the Snapshot tool (camera icon) from the top-right menu.
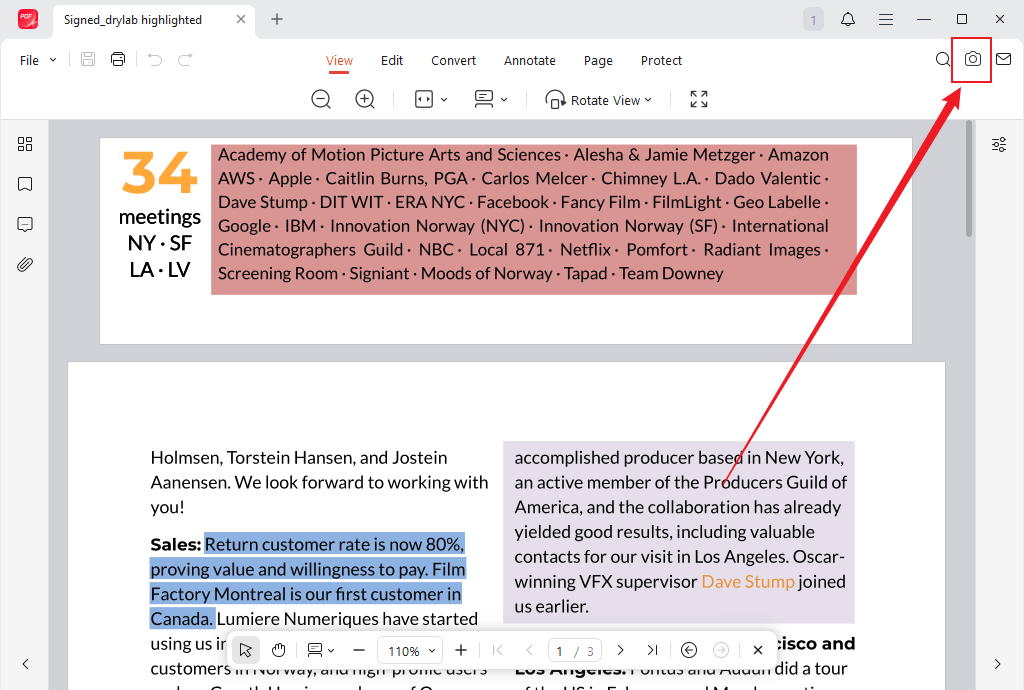
Drag the cursor to customize the print region.
Step 4. Once set, click the Download icon below the selected area. The captured image opens automatically in the computer’s built-in photo viewer.
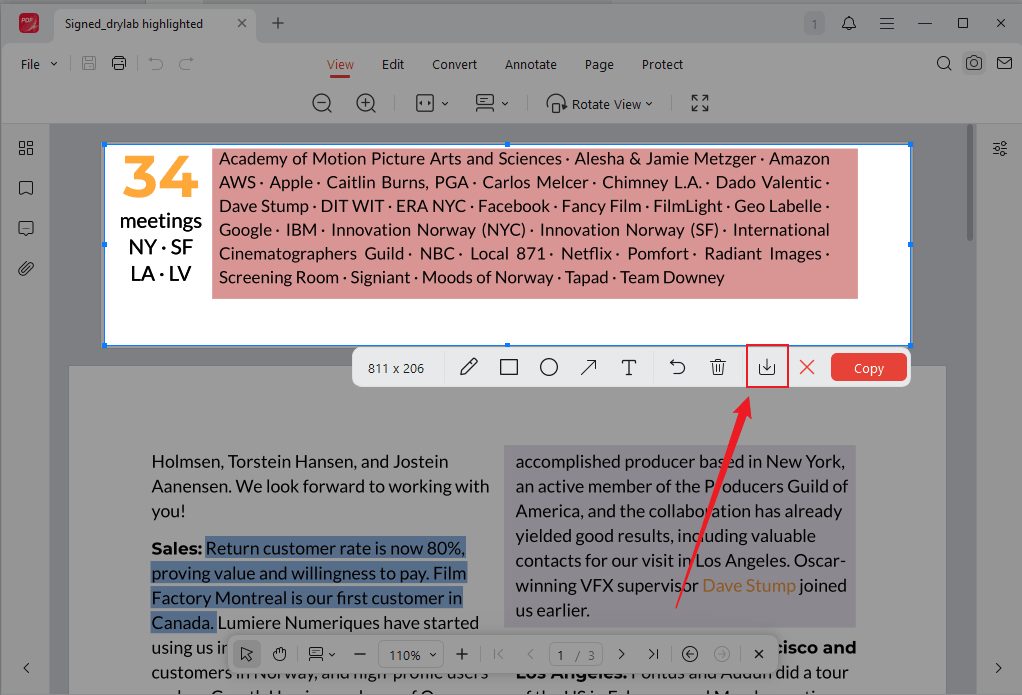
Now, press the Print option to print the selected PDF area. Alternatively, press Ctrl+P on Windows or Cmd+P on Mac to print the customized PDF region.

Additional Features of JOPDF:
- One of the best PDF converters, allowing quick and high-quality format conversions.
- Handle bulk conversion and large documents with ease.
- Merge several PDFs into a single file to keep your documents organized.
- Split large PDFs into smaller, more manageable sections.
- Adjust and compress long documents to the size you want.
- Easily combine images into one PDF to manage files from multiple photos or scans efficiently.
- Read, annotate, organize, and protect documents for easy management.
- Supports cross-platform use on Windows, Mac, and Linux for a versatile workflow.
How to Print a Selected Area in PDF Using Adobe Acrobat Reader
Supported OS: Windows, Mac, iOS, Android, and web browsers.
Adobe Acrobat Reader is a commonly used free PDF tool that provides options to view, annotate, and print PDF documents. With its built-in snapshot and print options, you can quickly print selected area in PDF using Adobe Acrobat without printing the whole page. Adobe Acrobat Reader also supports features such as print a PDF with comments, useful for both reviewing and distributing documents.
Learn how to print a selected area in PDF using Adobe Acrobat Reader in a few clicks.
Step 1. Download and install Adobe Acrobat Reader on your PC.
Step 2. Once launched, open the PDF in the program. And navigate to the page that contains the area you want to print.
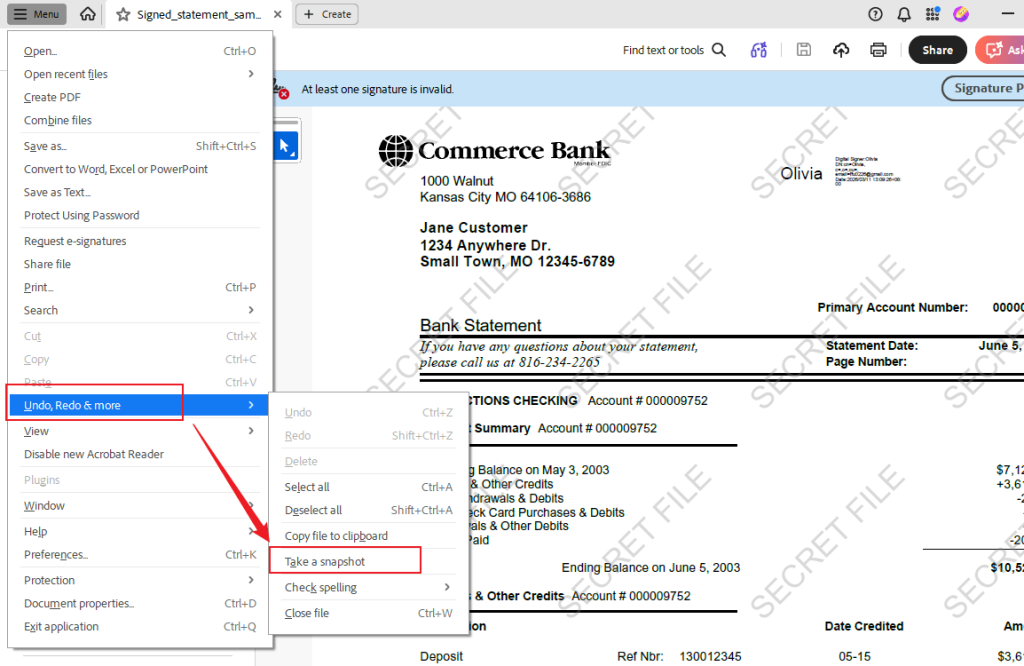
- On Windows: Select the hamburger menu in the upper left. Then select Undo, Redo & more.
- On macOS: Select Edit in the upper left. Then select Undo, Redo, and More.
Then, hit the Take a snapshot option.
Step 3. Drag a rectangle around the area you want to print.
Note. As soon as you release the mouse button, Acrobat will display a message: “The selected area has been copied.” And select the Print button from the upper right.
Step 4. In the Print dialog box, choose Selected graphic under the Pages to Print > More Options section.
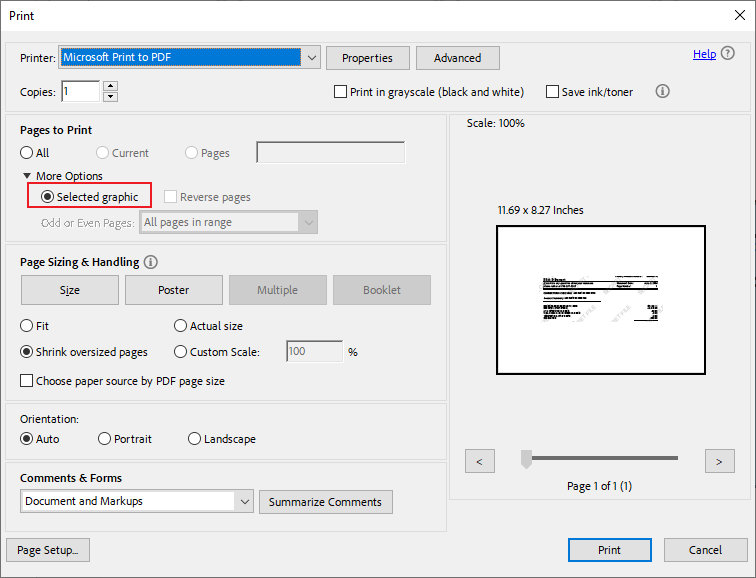
Note. To enlarge the selected text or graphic to fit the sheet of paper, choose Fit under the Page Sizing & Handling section.
Step 5. After adjusting the settings, press Print to print only the area you selected.
How to Print a Selected Portion in PDF Using Microsoft Edge
Supported OS: Windows, macOS, iOS, Android, Linux, and Apple Silicon Macs.
Microsoft Edge functions as a modern browser and an integrated PDF reader, allowing users to access PDFs without additional tools. It offers straightforward tools such as text selection and print options, making it simple to print selected portion of PDF directly from the browser. This makes it a convenient solution for quickly printing only the content you need
Let us find out how to print a selected portion in PDF using Microsoft Edge.
Step 1. Open the PDF document in Microsoft Edge. Then go to the page containing the area you wish to print.
Step 2. Click the Print icon or press Ctrl + P to open the print window.
Step 3. Go to the Page Setup dialog and set the Margins (inches) according to your preference. Type the exact measurements to adjust the Left, Right, Top,and Bottom margins.
Step 4. When the configuration is complete, click OK to print the desired portion of the PDF.
Note. Microsoft Edge cannot perform true area selection like Adobe Acrobat Reader can. Instead, the selected portion is printed by modifying page scaling and layout, so extra margins or nearby content may appear in the output.
Print the Selected Area in PDF with Mac Preview
Supported OS: Built in on iOS, iPadOS, and macOS.
Apple’s default Preview app is the default Mac app that allows users to conveniently view and open PDFs on Mac without additional software. It includes user-friendly tools for highlighting, selecting, and cropping PDFs so you can print the desired sections. Its built-in selection and printing tools let you easily print just the portion of a PDF you need.
Let us check out how to print the selected area in PDF with Mac Preview.
Step 1. Locate your PDF in Finder. Right-click the document, select Open With, and choose Preview.

Step 2. Scroll to the page containing the content you want to print.
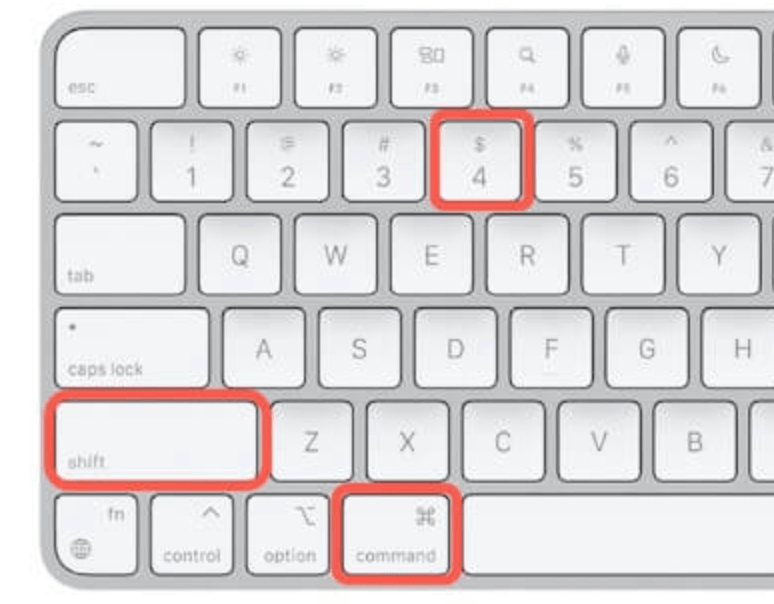
Step 3. Then, press Shift + Command + 4 keys. And click and drag to select the area you wish to print.
In this way, a screenshot file (PNG format) will appear on your desktop.
Step 4. Open the screenshot in Preview. Then, press Command + P. Select the printer and adjust other print settings as needed.
Step 5. When satisfied, click the Print button.
Final Words
Selective PDF printing offers a smart method for managing documents, saving both time and materials. Here, we covered how to print the selected area in PDF using various tools on Windows and Mac. Built-in tools such as Preview and Microsoft Edge offer fast ways to print only the portion of a document you need.
For a simpler, more flexible experience, JOPDF is a great choice because it works across multiple platforms and offers easy-to-use printing controls. Ultimately, decide on the best method for your device and workflow to print only the portion of the PDF you need.
FAQs
Here’s a list of some of the common reasons.
1. No area selected. You haven’t highlighted the part of the PDF to print.
2. Wrong tool active. The snapshot tool is required to select a graphic.
3. Security restrictions. PDF is password-protected or restricted.
4. Missing selection. Graphic frame or object not selected.
5. Locked layer/object. Part of a locked layer.
6. Flattened PDF. Image is background, not selectable.
7. Missing “Edit” mode. The Edit PDF toolset is not open.
Table of Contents
Your Best Free PDF Expert in PDF editing, compressing, converting, annotating, protect, organizing, and more.
Free DownloadWindows · macOS · Linux
Olivia
“Olivia is an editor at JOPDF, where she writes practical guides and insightful articles on managing PDFs—covering topics like editing, annotating, converting, and organizing files efficiently. Passionate about clear communication and digital productivity, Olivia enjoys spending her free time cooking, watching movies, and hiking to unwind and find inspiration for her writing.”
![Adobe Print to PDF Not Working [Reasons and Solutions]](https://b.jopdf.com/wp-content/uploads/2026/03/adobe-print-to-pdf-not-working.png)
![Solved! Microsoft Print to PDF Missing [Causes and 6 Fixes]](https://b.jopdf.com/wp-content/uploads/2026/02/microsoft-print-to-pdf-missing.png)