Introduction :
Saving a PowerPoint presentation as a PDF is one of the most reliable ways to share slides while preserving formatting, fonts, and layout. How to save PowerPoint as PDF? If you are looking for a comprehensive tutorial, you’re in the right place! In this JOPDF guide, I will walk you through how to save a PowerPoint as a PDF with or without notes.
In addition to preserving slide formatting, PDFs are preferred over PPT or PPTX files for several reasons. For instance, PDFs can open on almost any device without PowerPoint installed. Meanwhile, PDFs are often easier to email and upload. Owing to those reasons, some of you prefer to save a PowerPoint as a PDF.
How to save or download a PowerPoint as a PDF? Microsoft PowerPoint enables you to export files as PDFs. If you don’t install Microsoft PowerPoint, you can also use a converter, like JOPDF, to convert PowerPoint to PDF. Now, let’s delve into this comprehensive guidance!
How to Save a PowerPoint as a PDF
Microsoft PowerPoint itself offers 3 options for exporting presentation files as PDFs. Generally, the exact options vary slightly depending on your platform and PowerPoint version. Here, I will show you the most common methods as of 2025. Now, let’s check them one by one.
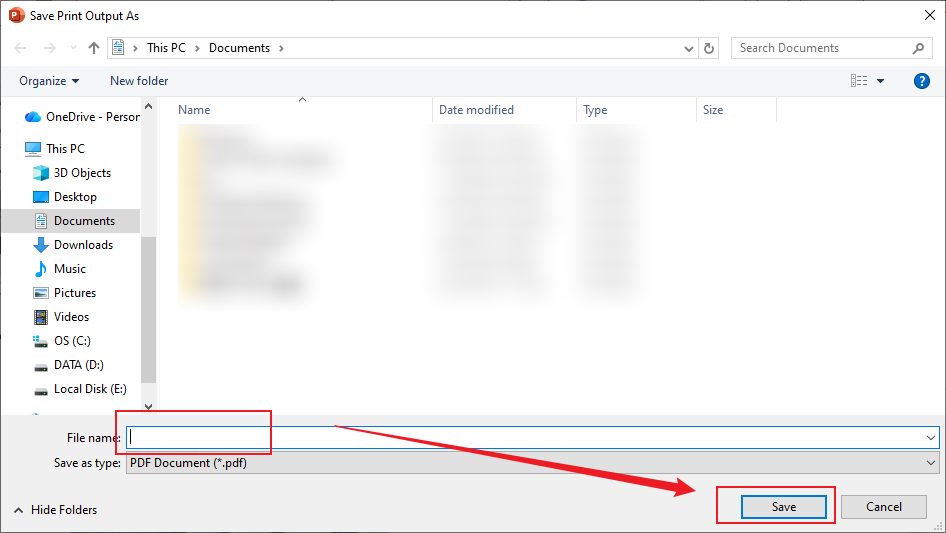
⭐Option 1. Using File > Save/Save As
Step 1. Open your presentation in PowerPoint.
Step 2. Click File, then select Save or Save As. Or, you can press Ctrl + S or Command + S.
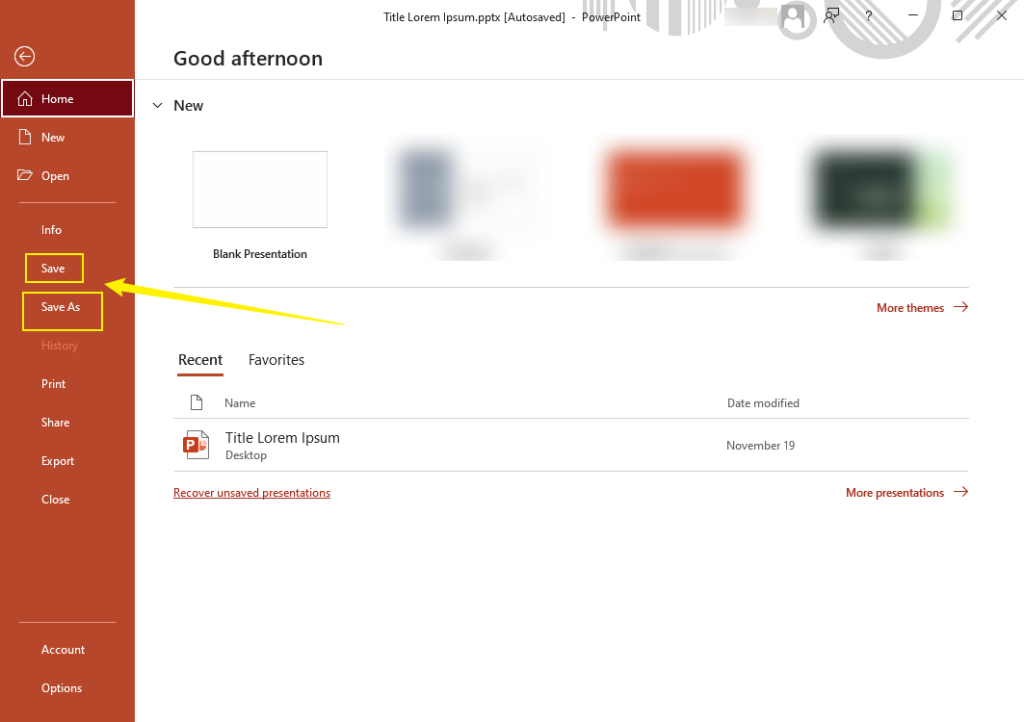
Step 3. Choose a folder to save the exported file and give it a name.
Step 4. Open the Save as type list and select PDF as the output format. Finally, click Save.

That’s quite simple and direct, right? In a few clicks, you can get the PowerPoint presentation as a PDF with original formatting and layout. Additionally, you can tick the Standard or Minimum size option for optimization.
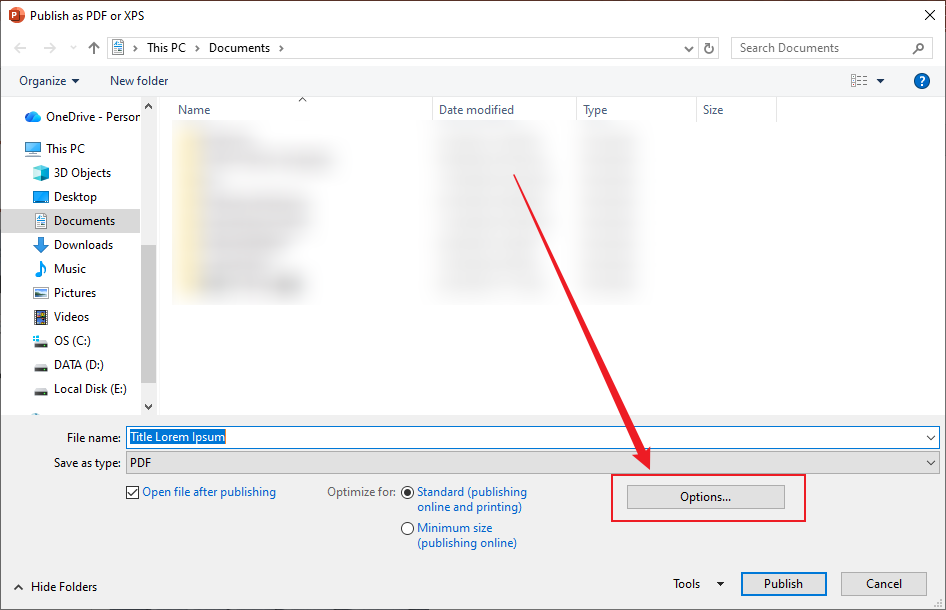
⭐Option 2. Using File > Export > Create PDF/XPS
Step 1. Once you have finished creating the presentation, click File and select the Export option.
Step 2. Choose the Create PDF/XPS Document option and click on Create PDF/XPS.

Step 3. Specify its saving path, name it, and click the Publish button.

⭐Option 3. Using Print to PDF
Step 1. Open your PowerPoint presentation, click File, and select Print. Alternatively, press shortcut keys: Ctrl + P or Command + P.
Step 2. Under Printer, select the Microsoft Print to PDF (for Windows) or Save as PDF (for Mac) option.
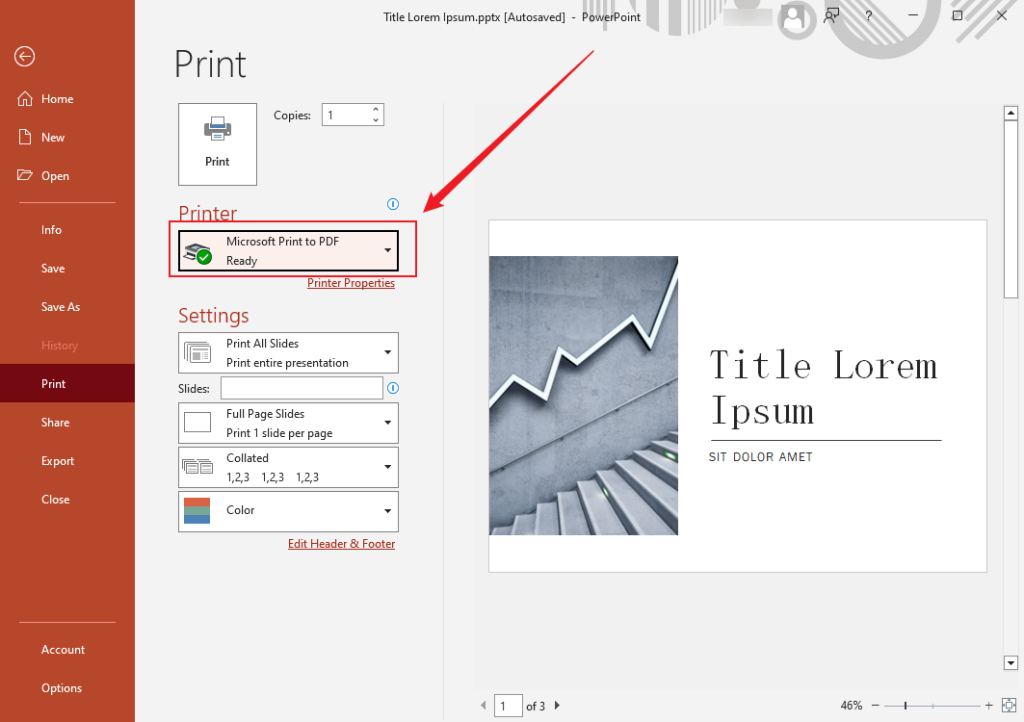
Step 3. Adjust other printing settings as needed. Next, click the Print button. A window will pop up asking you to choose a saving path and name the file. At last, click Save.
How to Save PowerPoint as PDF with Notes
PowerPoint offers speaker notes to prepare the words you plan to say during a presentation. Can you save a PowerPoint as a PDF with speaker notes? Of course, you can! Microsoft PowerPoint lets you save and print a PowerPoint presentation as a PDF with notes. How to save PowerPoint as PDF with notes? Here are two options for you to choose from.
⭐Option 1. Via Create PDF/XPS (Windows)
Step 1. After opening your PDF file with notes in PowerPoint, go to File > Export > Create PDF/XPS Document and click the Create PDF/XPS button.
Step 2. Select a location and give it a name. Then, make sure that PDF is selected as the type. Next, click the Options button.
Step 3. Under Publish what, select the Notes pages option. If you need, you can tick the Include comments checkbox. Then, click OK to save the changes.
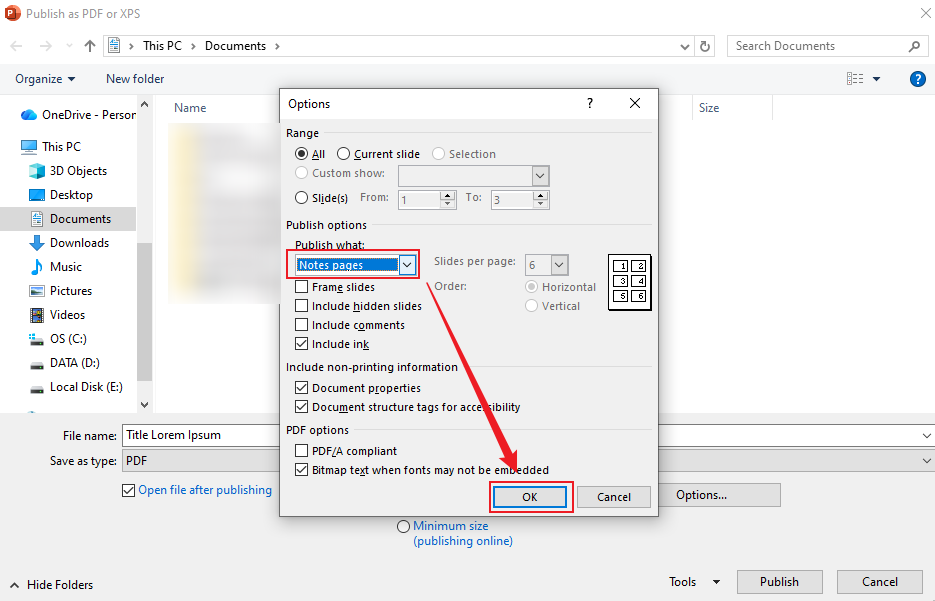
Step 4. Finally, click the Publish button to get a PDF file with notes.
⭐Option 2. Via Print to PDF (Work on Windows and Mac)
Step 1. Open your PowerPoint presentation, click File, and select Print.
Step 2. Select Microsoft Print to PDF (on Windows) or Save as PDF (on Mac) as the Printer.
Step 3. Under Settings (on Windows) or the second dropdown (on Mac), change the “Full page slides” option to “Notes Pages”.
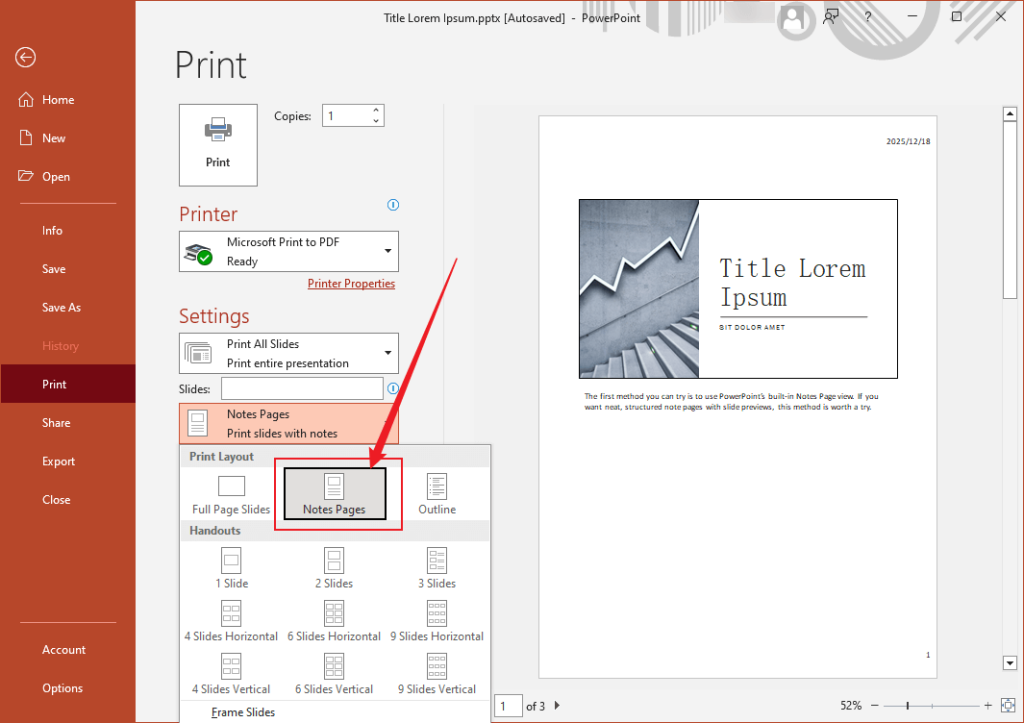
Step 4. At last, click Print and follow the on-screen instructions to save the PowerPoint as a PDF with notes.
Bonus: How to Convert PowerPoint to PDF for Free
How can you save a PowerPoint as a PDF if you don’t have Microsoft PowerPoint installed? In that case, you can take PDF converters into consideration. Compared with using paid converters, free and reliable converters should be your first choice. Here, I strongly recommend JOPDF, a completely free PDF editor and converter with no watermarks or hidden costs. It enables you to convert PowerPoint to PDF or vice versa. Additionally, it’s a batch PDF converter that can handle multiple conversions simultaneously.
What’s more, JOPDF supports converting PDFs to and from images, Word, and Excel. You can even use it to combine JPGs into one PDF. How to convert a PowerPoint to a PDF for free using JOPDF? Check the steps below.
Step 1. Click the button below to download this free PowerPoint to PDF converter on your Windows or Mac PC.
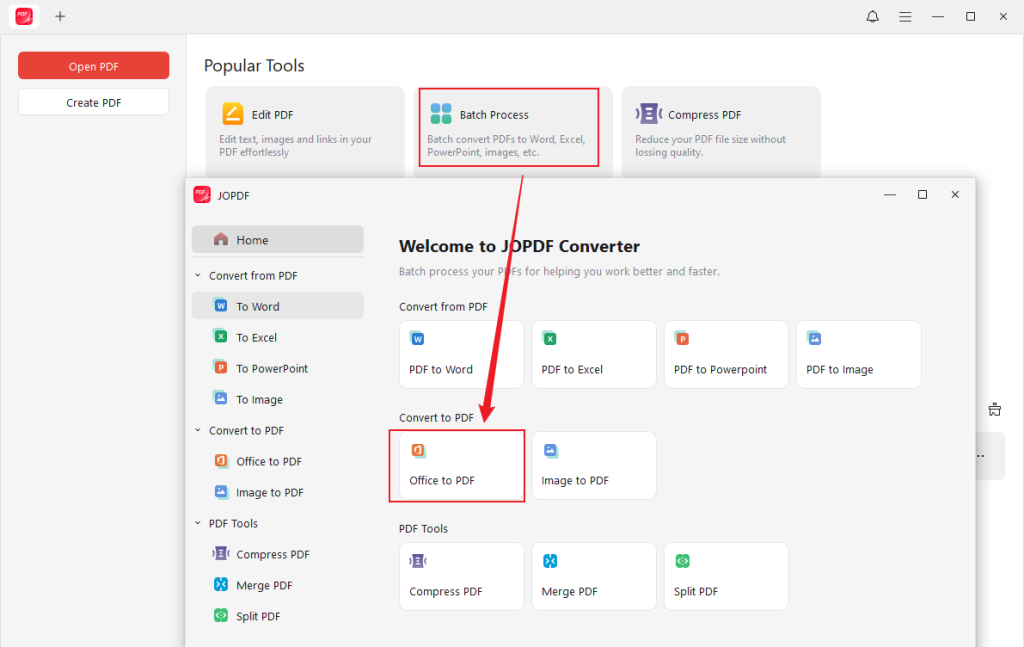
Step 2. Click the Batch Process option from its main interface and select the Office to PDF option under Convert to PDF.
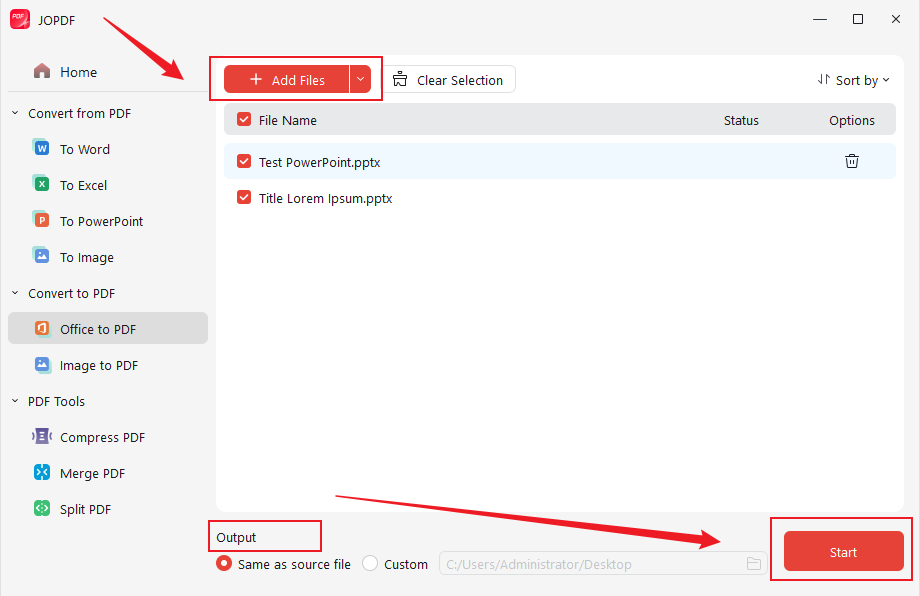
Step 3. Click Add Files to import your PowerPoint files. In the Output section, specify a folder to save the converted file. Finally, click Start to activate the PPT to PDF conversion process.
Final Words
Whether you are a student, professional, or educator, mastering how to save a PowerPoint as a PDF is a simple yet essential skill. You can use Microsoft PowerPoint’s built-in export feature or the Print to PDF method. Additionally, you can choose to save a PowerPoint with or without notes. If you don’t have Microsoft PowerPoint installed, try a PDF converter, like JOPDF, to convert PPT to PDF with ease.
You May Also Like:
FAQs
Option 1. Direct Export: Go to File > Export > Create PDF/XPS Document > Create PDF/XPS. Then, choose its saving path and name it. Next, click Options. Under Publish what, select the Handouts option. Expand the Slides per page dropdown and choose your desired page number. Finally, click OK and Publish.
Option 2. Print to PDF: Go to File > Print, change the default “Full Pages Slides” to “Handouts” under Settings. Next, select the number of slides per page. Set Microsoft Print to PDF or Save as PDF for Printer. Finally, click Print.
Table of Contents
Your Best Free PDF Expert in PDF editing, compressing, converting, annotating, protect, organizing, and more.
Free DownloadWindows · macOS · Linux
Olivia
“Olivia is an editor at JOPDF, where she writes practical guides and insightful articles on managing PDFs—covering topics like editing, annotating, converting, and organizing files efficiently. Passionate about clear communication and digital productivity, Olivia enjoys spending her free time cooking, watching movies, and hiking to unwind and find inspiration for her writing.”